
Is there a way to play music through your mic? Yes. In fact, there are many ways to play music through mic and in this tutorial I will share with you the best one I’ve used the most over the years. It’s fully free, it’s very flexible (compatible with anything) and safe. Once set up, you will never have to look at any other option for playing music through mic.
QUICK NOTE: I’ve tested this method on 3rd of December, 2023, on WINDOWS 11 (should be similar for Windows 10 and 7).
Oh, and as a bonus, I’ll include all the working troubleshooting tricks I used along the way that actually worked.
Following this tutorial, you’ll be able to:
- play the sounds from any selected audio source (Soundboard, Media Player, YouTube, Spotify, etc) through a virtual microphone in any selected voice application (games, Discord, etc).
- listen to that audio yourself at the same time (can be toggled on/off)
- and also talk through the mic yourself at the same time (can be toggled on/off)
(works even without a physical microphone, but then Your voice can’t be heard because you need a physical microphone to receive & transmit Your voice, as it’s not some voodoo magic shi…)
Used in this tutorial:
- VoiceMeeter
- Windows 11
- (Optionally for convenience: Soundboard)
Real Quick: How Does This Method Work?
Audio signals from the desired audio sources (our own voice via a mic, a soundboard sound, YouTube video audio, Spotify song, You name it) are routed to VoiceMeeter via VoiceMeeter Input. In VoiceMeeter, the signals get processed and then played through VoiceMeeter Output, which I like to call the “virtual microphone”.
Note: it’s all very flexible because there’s also a second output from VoiceMeeter, a second virtual microphone, if you will. That one goes into our speakers so that we can hear the same things that go into the virtual microphone, if we so choose. We can choose what we want to hear. We can choose to hear the triggered sounds and not ourselves speaking through the microphone, or we can change it to be the other way around, or we can play both the sound and talk through the mic at the same time. Very flexible indeed.
MAIN TUTORIAL: How To Play Music Through Mic With VoiceMeeter
1. download and install VoiceMeeter
You can get VoiceMeeter from https://vb-audio.com/Voicemeeter.

![Right-Click - Extract All... [This Compressed (Zipped) Folder Contains the Setup for VoiceMeeter]](https://micspamming.com/wp-content/uploads/2023/12/2.-VoiceMeeter-Compressed-Zipped-Folder-Right-Click-Extract-All.-MicSpamming-Compressed.jpg "Right-Click - Extract All... [This Compressed (Zipped) Folder Contains the Setup for VoiceMeeter]")


Run that VoiceMeeterSetup.exe file As Administrator to install VoiceMeeter and restart PC after installation is finished.

1. 1. How to Find VoiceMeeter After Installation?
Just in case you don’t know how to find VoiceMeeter (you can skip this if you know how, where, etc): Search – VoiceMeeter


2. Go to Sound Control Panel
Navigate to Sound Control Panel: Start Menu – Settings – System – Sound – (scroll down and…) More Sound Settings.


This is where you should end up at:

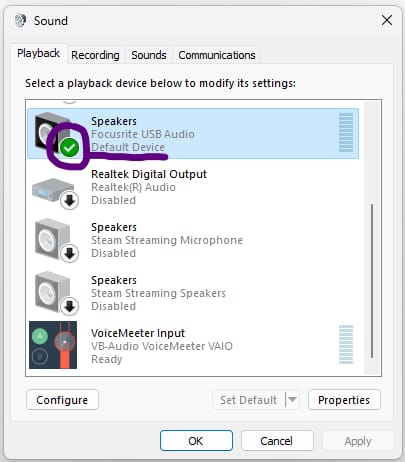
3. Enable VoiceMeeter Input and Output, Set Output as Default Device
Enable VoiceMeeter Input and Output and set VoiceMeeter Output as the default device under the Recording tab: right-click – tick Show Disabled Devices – Enable VoiceMeeter Input and Output – set VoiceMeeter Output as the Default Device.


Now do the same for VoiceMeeter Input under Playback tab if its not visible and enabled. Do not set VoiceMeeter Input as the default device though, keep your main headphone/speakers device as the default playback device.
 - tick Show Disabled Devices and Show Disconnected Devices")

4. Uniform Bit-Depth and Sample-Frequency Format + Other Settings
The standard seems to be 24-bit (bit depth) and 48000 Hz (sample frequency or sample rate) format. This is what I try to aim for.

Most games and applications use 24-bit 48000 Hz format, and the older ones tend to use 16-bit 44100 Hz from the original standard chosen from way back in 1980; and according to Nyquist theorem, human ear can hear frequencies from 20 Hz to 20000 Hz only, so double that (44100 Hz or 48000 Hz) should logically be more than enough. The difference in audio quality is said to be negligible between the standard and higher frequencies, and besides, going any higher can cause compatibility issues during down-scaling or whatever else resampling processes taking place to correct the mismatch, supposedly ultra rare nowadays, but I beg to differ. Also, sound can be converted with practically no loss between 16 bit and 24 bit, and resampling between 44100 and 48000 is fairly fast and the loss of quality is practically not noticeable, making 24-bit 48000 Hz standard the most stable and safest option.
HOWEVER, regardless if you’re using the standard values or not, you may want to make sure the sample frequency is matching across all your audio devices. Matching the sample frequency means the audio can be processed more directly, maintaining its integrity. If they don’t match, the audio has to be resampled (converted from one sample frequency to another), which can potentially lower the quality, and occasionally end up corrupted and start crackling and stuff. For example, my microphone’s sample at is set at 96000 Hz, so I have set everything else to 96000 Hz as well, for sample frequencies to match across all the local devices. However, that comes at the cost of higher latency along with potentially other minor problems I haven’t noticed or connected the dots on, as sometimes I have to mix up the frequencies to get the best quality.
As for 1 channel vs 2 channel dilemma, I’ve set my headphone(s) to 2 channel and microphone(s) to 1 channel. I’ve ran into a problem where the mic wasn’t picked up correctly in some voice applications when mic was set to use the 2 channel setting instead of the 1 channel setting. This has been the case for me through 3 different computers, 3 different Windows’, and 3 different microphones, so there’s definitely a pattern here. Some people, somehow, get away with using the 2 channel setting.
And thirdly, about the Exclusive Mode setting. Off, off, and off, always off. Never ticked on. It only works in some applications, and whenever you actually need it, the application will prompt you to enable it, so you can only win by disabling it from the get-go, especially for regular use. So, what Exclusive Mode does is like letting one single audio source program use your computer’s speakers all by itself, without sharing with other programs. This can make the music sound better coming from that one program because it gets the speakers’ full attention, but you won’t hear sounds from other programs while it’s being used. So, if there ever is a glitch in the matrix and the code gets mixed up somehow, why risk it? Just turn it OFF!
And one last setting… (this will remove any remaining issues and greatly improves the quality – exclusive mode regarding CPU usage)
(VoiceMeeter has to be opened) Task Manager – Details – Audiodg.exe – right-click Set Affinity – tick 1 CPU core only.
IMPORTANT TO NOTE: every time you restart VoiceMeeter, this setting will reset, so you have to do this every time you launch VoiceMeeter (you might get away without this optimization in the first place)…


5. Launch and Configure VoiceMeeter
Finally. Let’s open VoiceMeeter and set it up.

There it is. VoiceMeeter. In all its glory. Your window to the world of micspamming.
But now I hear you mutter something along the lines of: “Woah, what are all these options, and how to actually use it to play music through mic in games and other voice applications?”
Yes, before you can use it, we’ll have to figure out what’s what. It’s easier than it looks!
For starters, understand this distinction:
- VoiceMeeter INPUT – virtual headphone (sounds from sound application of your choice go to here, a la YouTube, Soundboard, etc)
- VoiceMeeter OUTPUT – virtual microphone (sounds to voice applications of your choice go from here, a la games, Discord, etc)
- – notice how input and output are mixed up – confusing, right?
- Microphone Brand X INPUT – your microphone
- Headphone Brand Y OUTPUT – your headphone
Now, focus only on these elements, nothing else:

- HARDWARE INPUT 1 – this is your microphone (recording device)
- Circle A – when enabled, your mic goes to your headphone only; when disabled, does not.
- Circle B – when enabled, your mic goes to virtual microphone (VoiceMeeter Output) only; when disabled, does not.
- VIRTUAL INPUT – this is “VoiceMeeter Input”, the virtual headphone (playback device)
- Circle A – when enabled, stuff playing into the virtual headphone (VoiceMeeter Input) goes to your headphones only; when disabled, does not.
- Circle B – when enabled, stuff playing into the virtual headphone (VoiceMeeter Input) goes to virtual microphone (VoiceMeeter Output) only; when disabled, does not.
- HARDWARE OUT A1 – this is your headphones (playback device)
- A MAIN OUT – audio from HARDWARE INPUT 1 + VIRTUAL INPUT = goes into your headphone (again, only if any “circle A” is enabled)
- (UNWRITTEN – Virtual microphone is separate from HARDWARE OUT A1 even though design-wise they’re seemingly connected somehow)
- B VIRTUAL OUT – audio from HARDWARE INPUT 1 + VIRTUAL INPUT = goes to virtual microphone (again, only if any “circle B” is enabled)
As you fiddle with the settings, a couple of things need explaining:

- HARDWARE INPUT 1 – WDM/MME/KS/ASIO, which one?
- They are to do with latency and stability (lower latency is better)
- ASIO – automatically assigns lowest latency option and is most stable
- WDM/KS – low latency, but can be unstable (if ASIO not available, WDM is 2nd best)
- MME – higher latency, but most stable
- If things are unstable (not working quite right), the best option is simply the one that just works (audio drivers are like GPUs – they come in all sorts of different quality from different companies)
- HARDWARE OUT A1 – same thing (and they don’t have to match, like ASIO with ASIO or WDM with WDM – no need to match here).
And one final thing to double check: Preferred SampleRate 96000 Hz

It should be at 96000 Hz by default, but doesn’t hurt to double check. In my case, Preferred Main SampleRate being at 96000 Hz improved the virtual mic’s audio quality, stabilized it entirely, so to speak. It might do that for you too. Notice how it doesn’t match with the standard safu 48000 Hz I’ve set for my devices, but in that specific setting location VoiceMeeter seems to vibe well with 96000 Hz. …It might be user-specific.
6. Time to Fire Up Some Music to Test It Out!
- Open any sound source program you have available to you (YouTube, Spotify, Windows Media Player, etc), play something in there for a brief moment, then hit pause (or leave it playing, doesn’t matter).
- Open Volume mixer (start – settings – system – sound – volume mixer)
- Locate the sound source program under Apps (within Volume mixer)
- Hit the small triangle arrow and set VoiceMeeter Input as the Output device of the sound source program
- Toggle Virtual Input circle B.
- Open any voice application program you have available to you (Discord, Steam, Audacity, Windows’ Sound Recorder, etc) and play back the virtual microphone (VoiceMeeter Output) to hear the sound from the program you chose to play the sound from.
- If you can’t hear the sound, go to the voice application program’s voice settings and make sure its input device is VoiceMeeter Output (as it may have overridden the Windows’ Default recording device setting).
Confused? Here’s an example test with pictures: (for this example, I’ll use Spotify on Firefox browser and Windows 11’s Sound Recorder)

So that was Spotify… Now the Volume mixer.

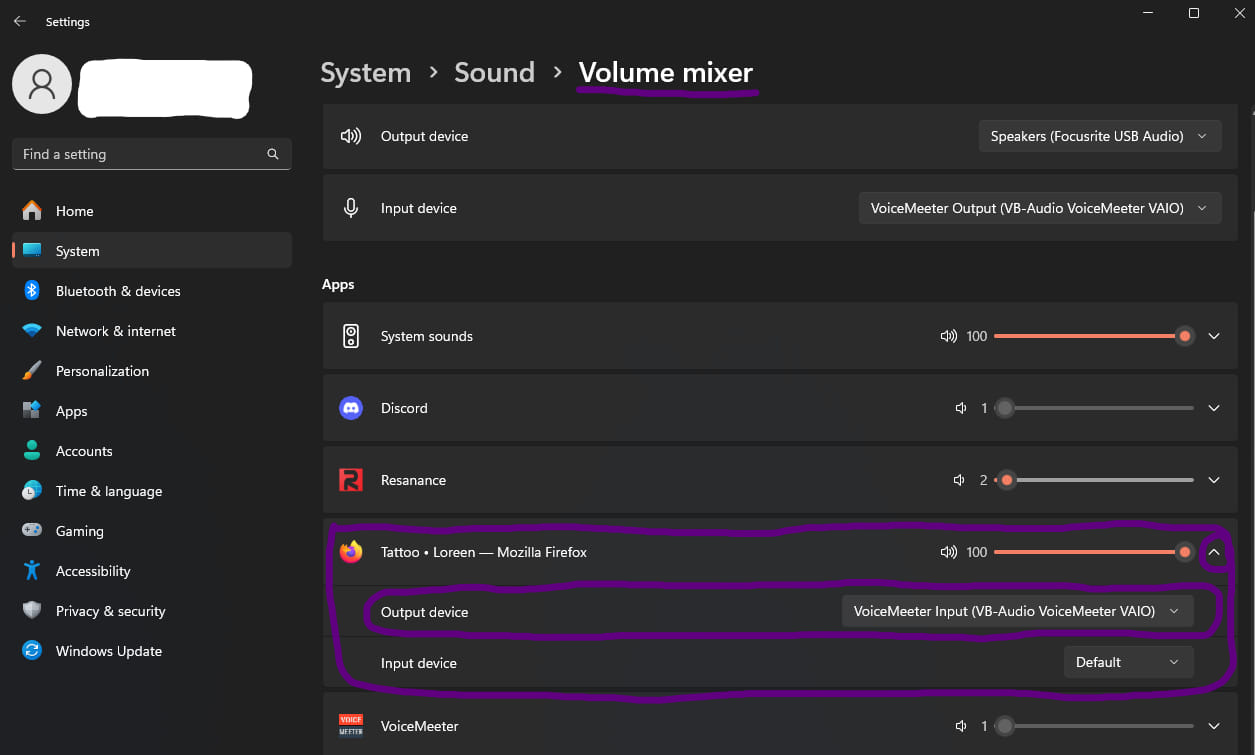
So what’s happening here is Spotify (on Firefox) is playing into VoiceMeeter Input, which in VoiceMeeter is routed to VoiceMeeter Output (the virtual microphone). If I launch the Windows’ Sound Recorder and record the microphone (virtual mic or VoiceMeeter Output, our default input device in Sound Control Panel), the song from spotify will be recorded as if coming out of a microphone.
For that to happen, circle B under VoiceMeeter Input in VoiceMeeter interface needs to be enabled.

Test successful on your end as well?
Now, if you understand how it works, you can see it’s pretty flexible. We don’t have to rely on Volume mixer at all if the sound source program (a media player, soundboard, etc) has its own “output” and “input” setting as we can just use VoiceMeeter Input as its “output”, and that way the sound ends up in the virtual microphone (VoiceMeeter Output). And since VoiceMeeter Output is set as the default recording device in Sound Control Panel, all voice applications we run will be using this virtual microphone as their input device by default (or we can individually set the target program to use it as its input device – remember, flexible stuff, as long as you understand it). We can talk and blast music, toggle on/off either, everything. It’s an all-in-one solution to playing music or any audio through mic for free [(for real, it’s free, it’s not a free trial, it’s actually just free (donationware)].
PRACTICAL APPLICATIONS: Play Music Through Mic with VoiceMeeter
To get the most out of these, make sure to follow through with the MAIN TUTORIAL if you haven’t already.
How to Play Music Through Mic in Games on Steam

Remember your training. If you’ve set up the method demonstrated in “MAIN TUTORIAL” section at the beginning of this article, Steam’s input device should be VoiceMeeter Output by default already. If it isn’t, simply set VoiceMeeter Output as the default device in Sound Control Panel or in Steam’s voice settings. Going forward, all that’s left for us to do is double check if it’s so and then just test it out.

For that, open the Steam app and navigate to Steam’s voice settings: Steam – Settings – Voice – Voice Input Device.
Steam’s Voice Input has to either be “Default” or “VoiceMeeter Output”.
Now hit Start Microphone Test to test the virtual microphone.
For best quality, set Voice Transmission Threshold to Off status. Additionally, click on the Show button to reveal Advanced Options and make sure Echo Cancellation, Noise Cancellation, and Automatic Volume/Gain Control are all toggled Off.
Doing this allows you to play music, sounds, or any audio of your choosing through mic in Steam games such as: Rust, Counter-Strike: Global Offensive, Hell Let Loose, Insurgency Sandstorm, Holdfast: Nations at War, Rainbow Six Siege, Squad, Foxhole, Grand Theft Auto V, Battlebit, New World, and all other games on Steam that have voice chat.
How to Play Music Through Mic on Discord

Remember your training. If you’ve set up the method demonstrated in “MAIN TUTORIAL” section at the beginning of this article, Discord’s input device should be VoiceMeeter Output by default already. If it isn’t, simply set VoiceMeeter Output as the default device in Sound Control Panel or in Discord’s voice settings. Going forward, all that’s left for us to do is double check if it’s so and then just test it out.

For that, open the Discord app and navigate to Discord’s Voice & Video settings: Discord – User Settings – Voice & Video.
Discord’s Voice Input has to either be “Default” or “VoiceMeeter Output”.
Now hit Let’s Check to test the virtual microphone.
For best quality, toggle Echo Cancellation Off. Additionally, select None under Noise Suppression.
How to Play Music Through Mic in Skype

Remember your training. If you’ve set up the method demonstrated in “MAIN TUTORIAL” section at the beginning of this article, Skype’s input device should be VoiceMeeter Output by default already. If it isn’t, simply set VoiceMeeter Output as the default device in Sound Control Panel or in Skype’s voice settings. Going forward, all that’s left for us to do is double check if it’s so and then just test it out.

For that, open the Skype app and navigate to Skype’s Audio & Video settings: Skype – Settings – Audio & Video.
Skype’s Microphone has to either be “Default” or “VoiceMeeter Output”.
Now hit Make a free test call to test the virtual microphone.
For best quality, set Noise Cancellation as low (NOT off). Additionally, for Skype to pick up the test sound, start the music only after the beep and not before the beep.
How to Play Music Through Mic on Zoom

Remember your training. If you’ve set up the method demonstrated in “MAIN TUTORIAL” section at the beginning of this article, Zoom’s input device should be VoiceMeeter Output by default already. If it isn’t, simply set VoiceMeeter Output as the default device in Sound Control Panel or in Zoom’s voice settings. Going forward, all that’s left for us to do is double check if it’s so and then just test it out.

For that, open the Zoom app and navigate to Zoom’s Audio settings: Zoom – Settings – Audio.
Zoom’s Microphone has to either be “Same as System” or “VoiceMeeter Output”.
Now hit Test Mic to test the virtual microphone.
For best quality, set Background Noise Suppression under Audio Profile as Low.
How to Play Music Through Mic on Revolt.Chat

Remember your training. If you’ve set up the method demonstrated in “MAIN TUTORIAL” section at the beginning of this article, Revolt’s input device should be VoiceMeeter Output by default already. If it isn’t, simply set VoiceMeeter Output as the default device in Sound Control Panel or in Zoom’s voice settings. Going forward, all that’s left for us to do is double check if it’s so and then just test it out.

For that, open the Revolt app and navigate to its Audio settings: Revolt – Settings – Voice Settings.
Revolt’s Microphone (input device) has to either be “Default” or “VoiceMeeter Output”.
There is no way to test microphone in Revolt without the help of a friend or 2nd account. We can only confirm that the virtual mic (VoiceMeeter Output) is in fact the input device in Revolt, and based on previous tests with other apps, it should be working.
How to Play Spotify Through Mic

Spotify is available as a browser-based music player, but also as a standalone app. In either case, remember your training. I’ll go over the setup with the standalone app. Now, if you’ve set up the method demonstrated in “MAIN TUTORIAL” section at the beginning of this article, Spotify’s output device needs to be manually changed to use VoiceMeeter Input in Volume mixer. The standalone app does not have the options for choosing input/output devices, it’s using default devices. Going forward, all that’s left for us to do is double check our settings and then just test it out.

For that, open Volume mixer and set Spotify’s Output Device as VoiceMeeter Input: Search – Settings – System – Sound – Volume mixer.
Note that you have to briefly play a song in Spotify for it to show up in Volume mixer.
")
Make sure Circle A is toggled on under VIRTUAL INPUT in VoiceMeeter interface in order to test if Spotify is playing into VoiceMeeter and thus into the virtual microphone (remember, if Circle B is toggled on, it goes into the virtual mic, if it’s toggled off, it does not; and if Circle A is toggled on, it goes to your headphones, if it’s toggled off, it does not).
Since VoiceMeeter Output is our default recording device, it’ll be the default microphone input for any voice application you’re using.
You can test the virtual microphone (VoiceMeeter Output) at https://mictests.com/. Make sure Circle B is enabled for that.
How to Play YouTube Through Mic

Remember your training. If you’ve set up the method demonstrated in “MAIN TUTORIAL” section at the beginning of this article, whichever browser you’re using to play YouTube, the browser’s output device needs to be manually changed to use VoiceMeeter Input in Volume mixer. Going forward, all that’s left for us to do is double check our settings and then just test it out.

For that, open Volume mixer and set the browser’s (YouTube) Output Device as VoiceMeeter Input: Search – Settings – System – Sound – Volume mixer.
Note that you have to briefly play some audio in YouTube for it to show up in Volume mixer.

Make sure Circle A is toggled on under VIRTUAL INPUT in VoiceMeeter interface in order to test if YouTube is playing into VoiceMeeter and thus into the virtual microphone (remember, if Circle B is toggled on, it goes into the virtual mic, if it’s toggled off, it does not; and if Circle A is toggled on, it goes to your headphones, if it’s toggled off, it does not).
Since VoiceMeeter Output is our default recording device, it’ll be the default microphone input for any voice application you’re using.
You can test the virtual microphone (VoiceMeeter Output) at https://mictests.com/. Make sure Circle B is enabled for that.
How to Play SoundCloud Through Mic

I was about to write that SoundCloud has a standalone PC app we can use, but then I tried it and it’s just a Microsoft Edge browser page. So let’s ignore that and go with the regular browser SoundCloud website interface.
So then, remember your training once again. If you’ve set up the method demonstrated in “MAIN TUTORIAL” section at the beginning of this article, your browser’s (SoundCloud) output device needs to be manually changed to use VoiceMeeter Input in Volume mixer. Going forward, all that’s left for us to do is double check our settings and then just test it out.

For that, open Volume mixer and set SoundCloud’s Output Device as VoiceMeeter Input: Search – Settings – System – Sound – Volume mixer.
Note that you have to briefly play a song in SoundCloud for it to show up in Volume mixer.
. Circle A means the sound goes into your headphones")
Make sure Circle A is toggled on under VIRTUAL INPUT in VoiceMeeter interface in order to test if SoundCloud is playing into VoiceMeeter and thus into the virtual microphone (remember, if Circle B is toggled on, it goes into the virtual mic, if it’s toggled off, it does not; and if Circle A is toggled on, it goes to your headphones, if it’s toggled off, it does not).
Since VoiceMeeter Output is our default recording device, it’ll be the default microphone input for any voice application you’re using.
You can test the virtual microphone (VoiceMeeter Output) at https://mictests.com/. Make sure Circle B is enabled for that.
Thanks, it’s very informative
Yes! Finally someone writes about how to do actually do it.